Standardizing At-Home Skin Photos for Accurate Comparison
A three-shot sequence with proper lighting captures what dermatologists need to see.
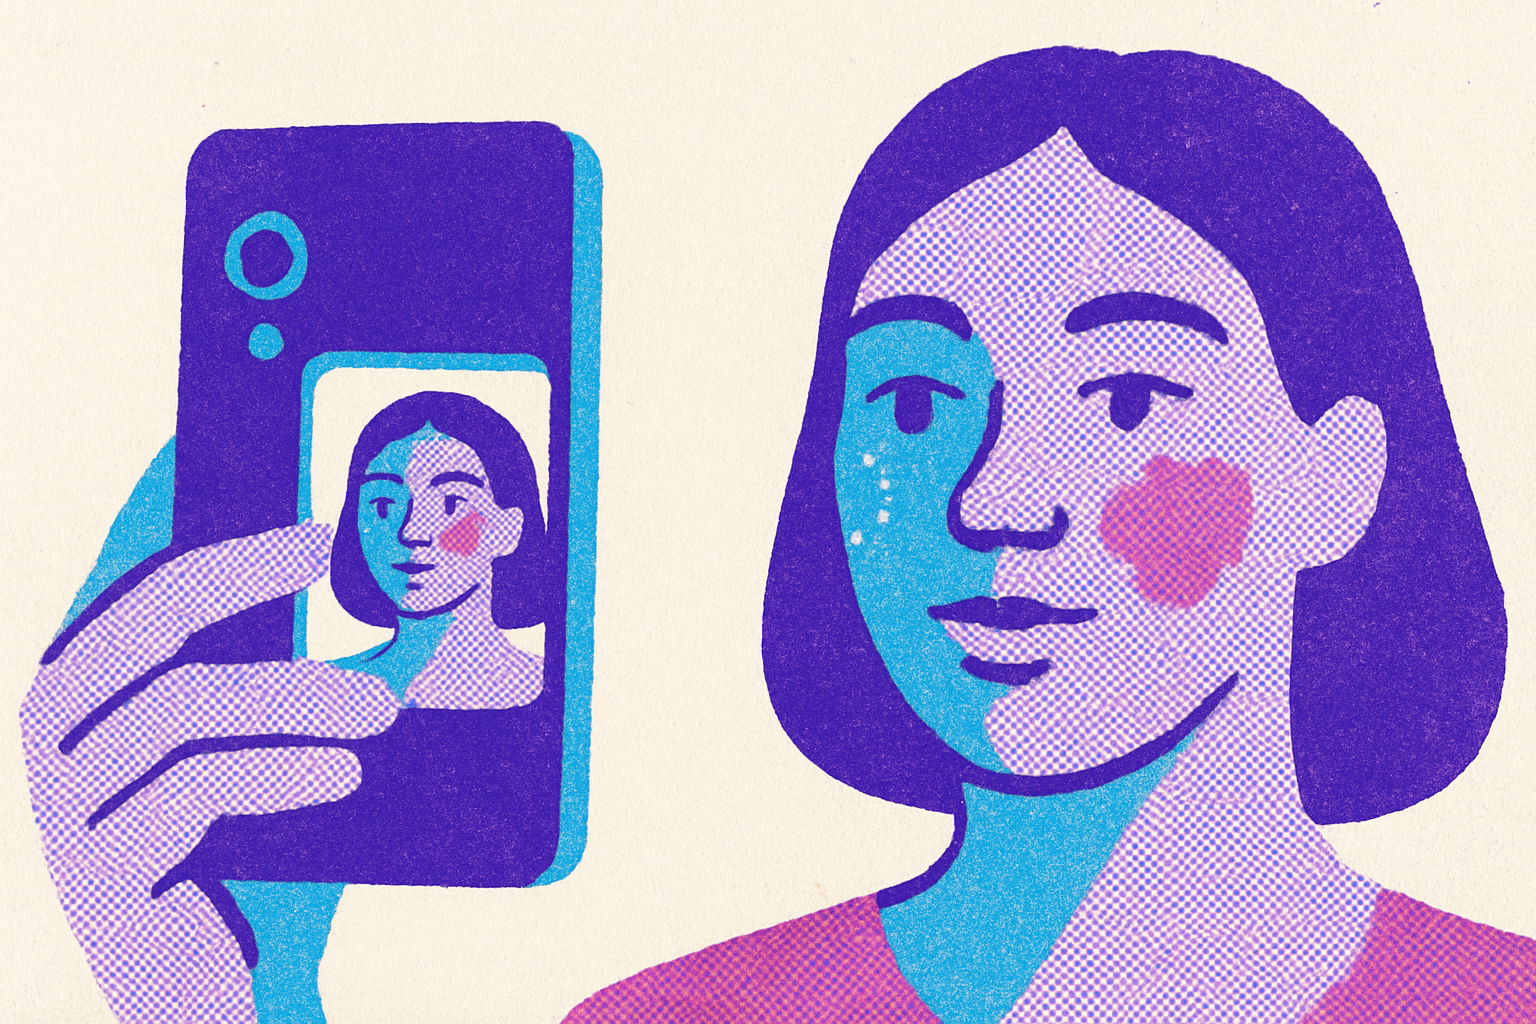
A photo you take at home only helps a dermatologist if it captures what an office visit would: location, size, color, border, texture, in a form that can sit next to the next photo you take and actually compare. That gap between a casual snapshot and a clinically usable image is where store-and-forward teledermatology lives or dies. I've spent enough time looking at patient-submitted photos to know exactly where they tend to fall apart, and it's rarely for the reason people expect.
What store-and-forward teledermatology actually requires from a patient photo
Store-and-forward is the asynchronous model. You submit photos and a short history, a clinician reviews them on their own schedule, and an assessment comes back without either of you needing to be online at the same moment. Dermatology happens to suit this model better than almost any other specialty, because so much of what a clinician needs is sitting right there in a well-composed image plus a few sentences of context, since skin is visual by nature and that's the whole premise.
"Well-composed" is carrying a lot of weight in that sentence, though. What does a clinician on the other end actually need to see?
Location and distribution matter first: where on the body the condition sits, and whether it's one spot or several, symmetric or scattered. Then the lesion itself: size, shape, border, color, texture. And enough of the surrounding skin to tell whether this looks new or like an old condition flaring up again.
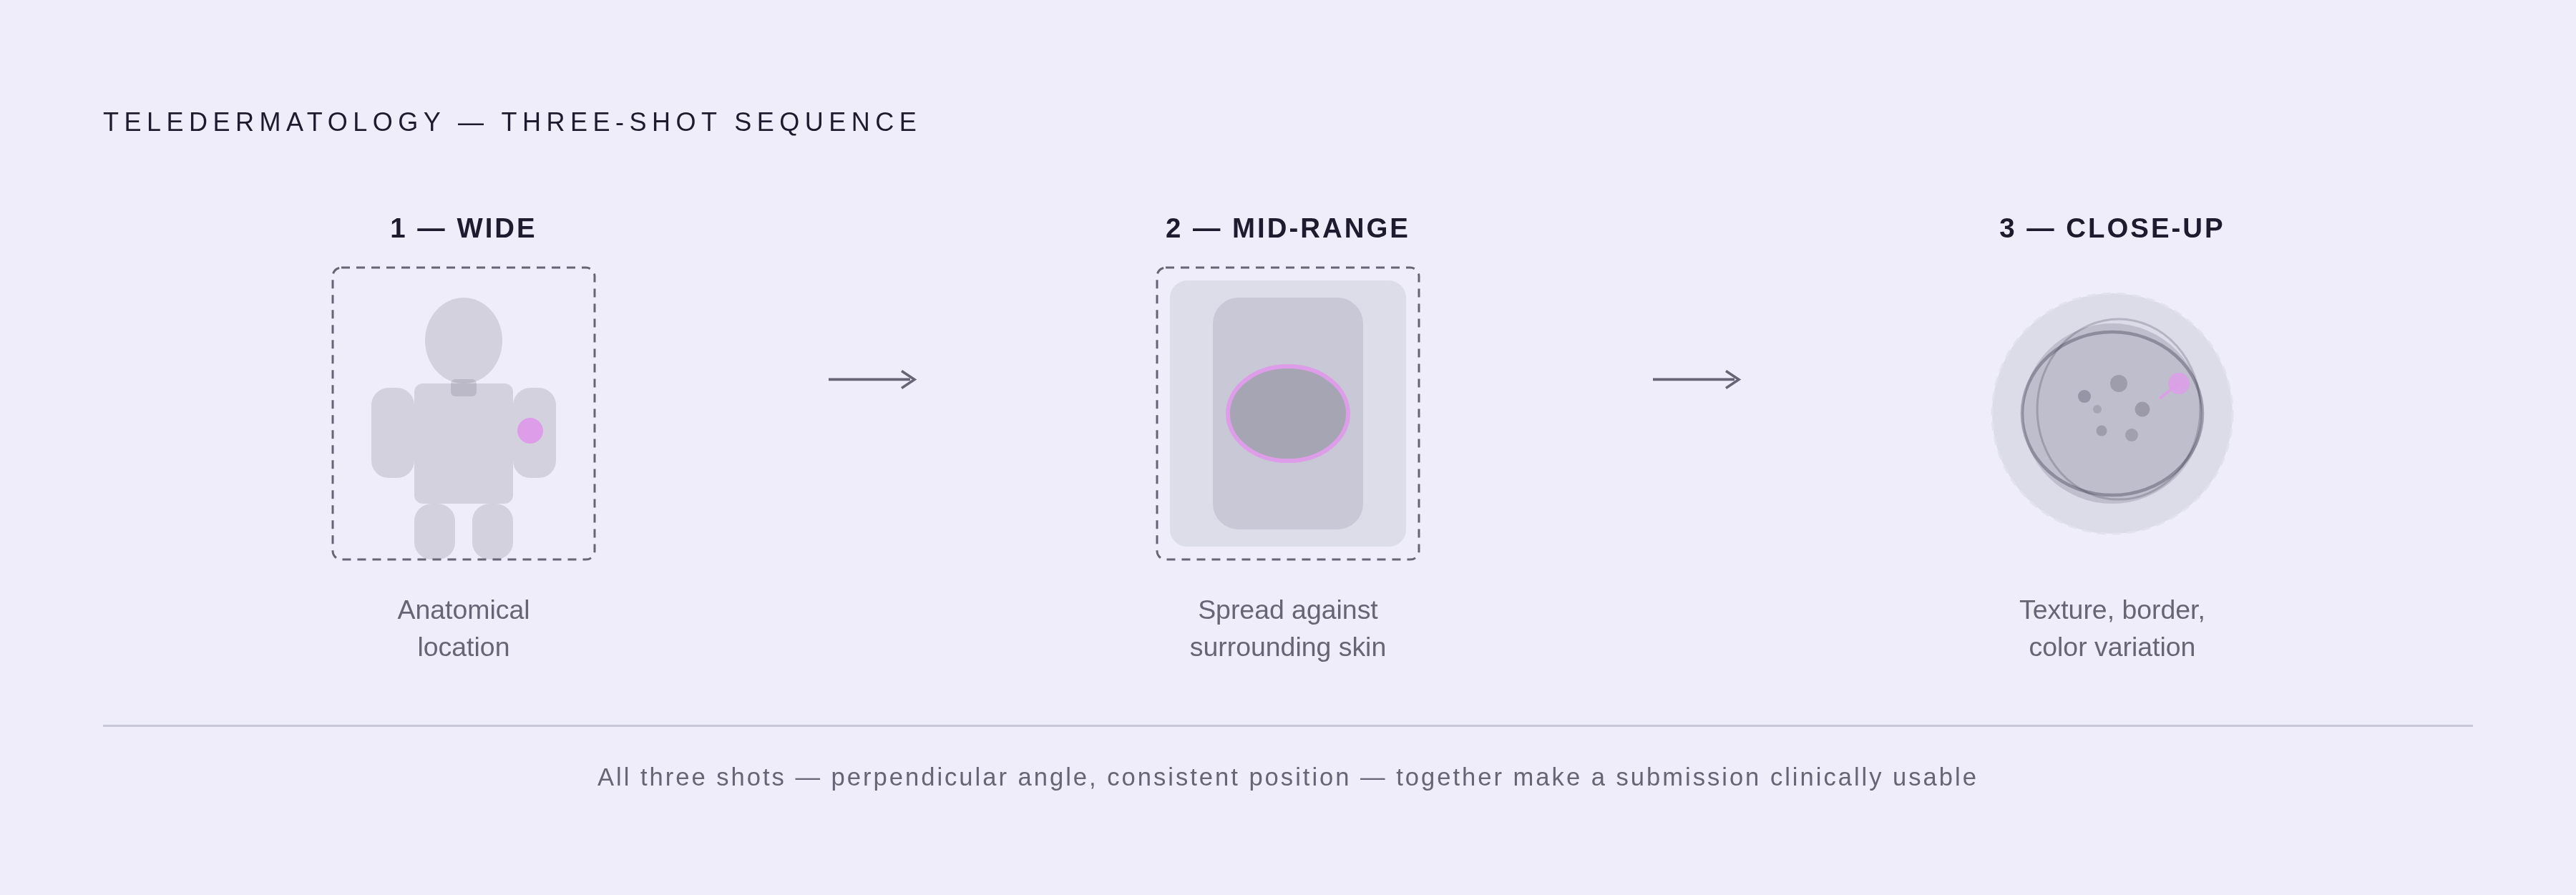
The International Skin Imaging Collaboration's framework, along with most clinical imaging guidance, converges on a three-shot sequence. A wide shot for anatomical location, answering "where on the body is this." A mid-range shot showing the affected area against surrounding skin, useful for gauging spread. A close-up for surface detail, texture, border irregularity, color variation. All three should come from a consistent angle, not three different angles of convenience because that's how the light happened to fall.
Systematic reviews on teledermatology keep landing on image quality and framing as major drivers of how well the whole encounter works. A clinician can't diagnose what they can't clearly see, and they can't make a judgment call on a photo that leaves scale or location ambiguous. This shouldn't be treated like a checklist to memorize. Think instead about what the clinician is trying to rebuild in their head from your photo. Once that clicks, good framing decisions start coming naturally, even in situations no checklist covered.
Lighting: the variable that undermines more photos than any other
Ask any dermatologist what wrecks the most patient photos, and lighting wins by a wide margin. Natural, indirect daylight is the standard recommendation, for good reason: consistent color temperature, no hard shadows, no glare.
Flash fails on every one of those counts. It throws specular glare across the skin, washing out the exact texture your close-up shot exists to capture. It flattens color gradients, and in dermatology, a subtle shift in color is often the earliest sign something's changing. Wipe out that gradient with a flash and you've wiped out the signal along with it. This gets worse for darker skin tones, where phone auto-exposure already tends to overexpose in an attempt to "correct" for it; add flash on top, and the image can lose the color information a clinician actually needs to work with.
So what does this look like in practice? Face a window rather than putting your back to it, since your back to the window lights the room instead of your skin. Overcast daylight is close to ideal; direct sun creates harsh shadows and hot spots that behave a lot like flash does. If there's no natural light on hand, two diffuse artificial lights positioned at 45-degree angles to each other keep any single shadow from dominating the frame.
For darker skin tones specifically, published guidance on photographing skin of color recommends a plain, non-reflective, light-toned or royal blue background, which helps prevent overexposure and keeps color rendering closer to accurate. One more thing, and it's easy to miss, is to turn off HDR before you even open the camera app. HDR blends multiple exposures to make the image look more polished, but that blending shifts color rendering in ways that can misrepresent actual skin tone. For clinical purposes, accuracy matters more than polish, every time, no exceptions.
Distance, angle, and focus: the geometry of a replicable photo
Angle matters more than most people assume going in. The lens needs to sit parallel to the skin, not tilted up, down, or off to one side. An angled shot distorts apparent size, and when the entire point of a follow-up photo is tracking whether something is growing, size distortion isn't cosmetic, it's the whole point of taking the photo in the first place.
Clinical research settings handle this with 3D imaging systems that map true dimensions regardless of camera position. Home setups rely on a simpler workaround: a 2D photo, shot from a consistent perpendicular angle, every single time. Less elegant than 3D mapping, sure, but reproducible, and reproducible is the thing that actually matters when you're comparing month three to month one.
Distance follows the same logic. Stand three to four feet back and use zoom sparingly, no more than half your camera's range, and image quality holds up in a way it won't if you walk in close and crop tight instead. Phone cameras lose sharpness fast once you push zoom much past that.
Focus is where otherwise solid photos quietly fall apart. Autofocus has no idea what you're trying to capture; it'll lock onto a shirt fold or a shadow just as happily as it'll lock onto the lesion. Tap the screen right on the spot you want sharp before you shoot, and if the result looks even slightly soft on review, retake it rather than talking yourself into "good enough" on a blurry image, because a clinician may simply not be able to use it. Skip digital zoom entirely for close-ups too, since it enlarges pixels without capturing more detail.
Keep this in the back of your mind through all of it: this exact photo needs to be matched by another one in a few weeks. Getting the angle and distance right once isn't the bar. Repeatable is the bar.
Background and preparation: what else the camera sees
A busy or patterned background does more damage than people expect. It competes visually with the skin and throws off how contrast and color read, even to a trained eye. Plain, matte, neutral is the standard here: a white or light gray wall, or a plain sheet laid flat behind the area in question.
Everything else needs to stay out of frame, too, including jewelry, watches, and hair ties near the affected area, clothing partially covering the shot, and bandages or topical cream sitting on the lesion itself, since clean skin gives the clearest possible read of what's actually happening underneath.
Prep gets skipped constantly, and it shouldn't be. The area needs to be clean and dry when you shoot: no lotion, no makeup, no powder over the lesion. Anything on the skin changes how light bounces off it, and that changes how color and texture show up in the final image.
For spots that are genuinely hard to reach solo, the back, the scalp, behind an ear, don't twist into some contorted self-portrait that ruins the angle you worked to get right everywhere else. Ask someone to take it for you, since a second pair of hands solves a geometry problem no amount of camera skill fixes on its own.
Making photos comparable over time: the serial protocol
One photo shows you what something looks like today, while a series, shot the same way every time, shows you whether it's changing. And change, more than appearance on any given day, is usually the thing a clinician actually cares about.
Consistency here means locking down more variables than people expect going in. Same time of day, since lighting shifts meaningfully between morning and evening. Same body position, so if an arm was extended a certain way in the first photo, extend it the same way again. Same distance, measured against something fixed in the room, a counter edge, a doorframe, rather than eyeballed each time. Same background location, when that's practical.
This discipline shows up in formal research too. Clinical trial protocols for atopic dermatitis, including the Phase 3 program for baricitinib, pick a handful of representative body sites, usually four to six, at the first visit, then rephotograph those exact spots at every visit after. It works at home for the same reason it works in a trial: comparability comes from sameness, not from any single photo being technically excellent.
Label everything as you go, noting the date, body area, and anything that changed since last time, a new product, a dose adjustment, a known trigger like stress or a new detergent. Your camera roll sorts by date, not by body part, so a mixed folder of unrelated photos turns useless fast. A separate album per condition keeps things grouped in a way that actually supports comparison instead of forcing you to scroll and guess which mole is which.
Done well, this is what lets you and your clinician tell real progress, or real worsening, apart from the ordinary noise skin conditions produce on their own.
How image quality affects what AI-assisted review can and cannot detect
AI tools in dermatology work from the same pixel data a human reviewer looks at. A blurry, poorly lit photo doesn't just make a human's job harder, it degrades what an algorithm can pull out of the image too.
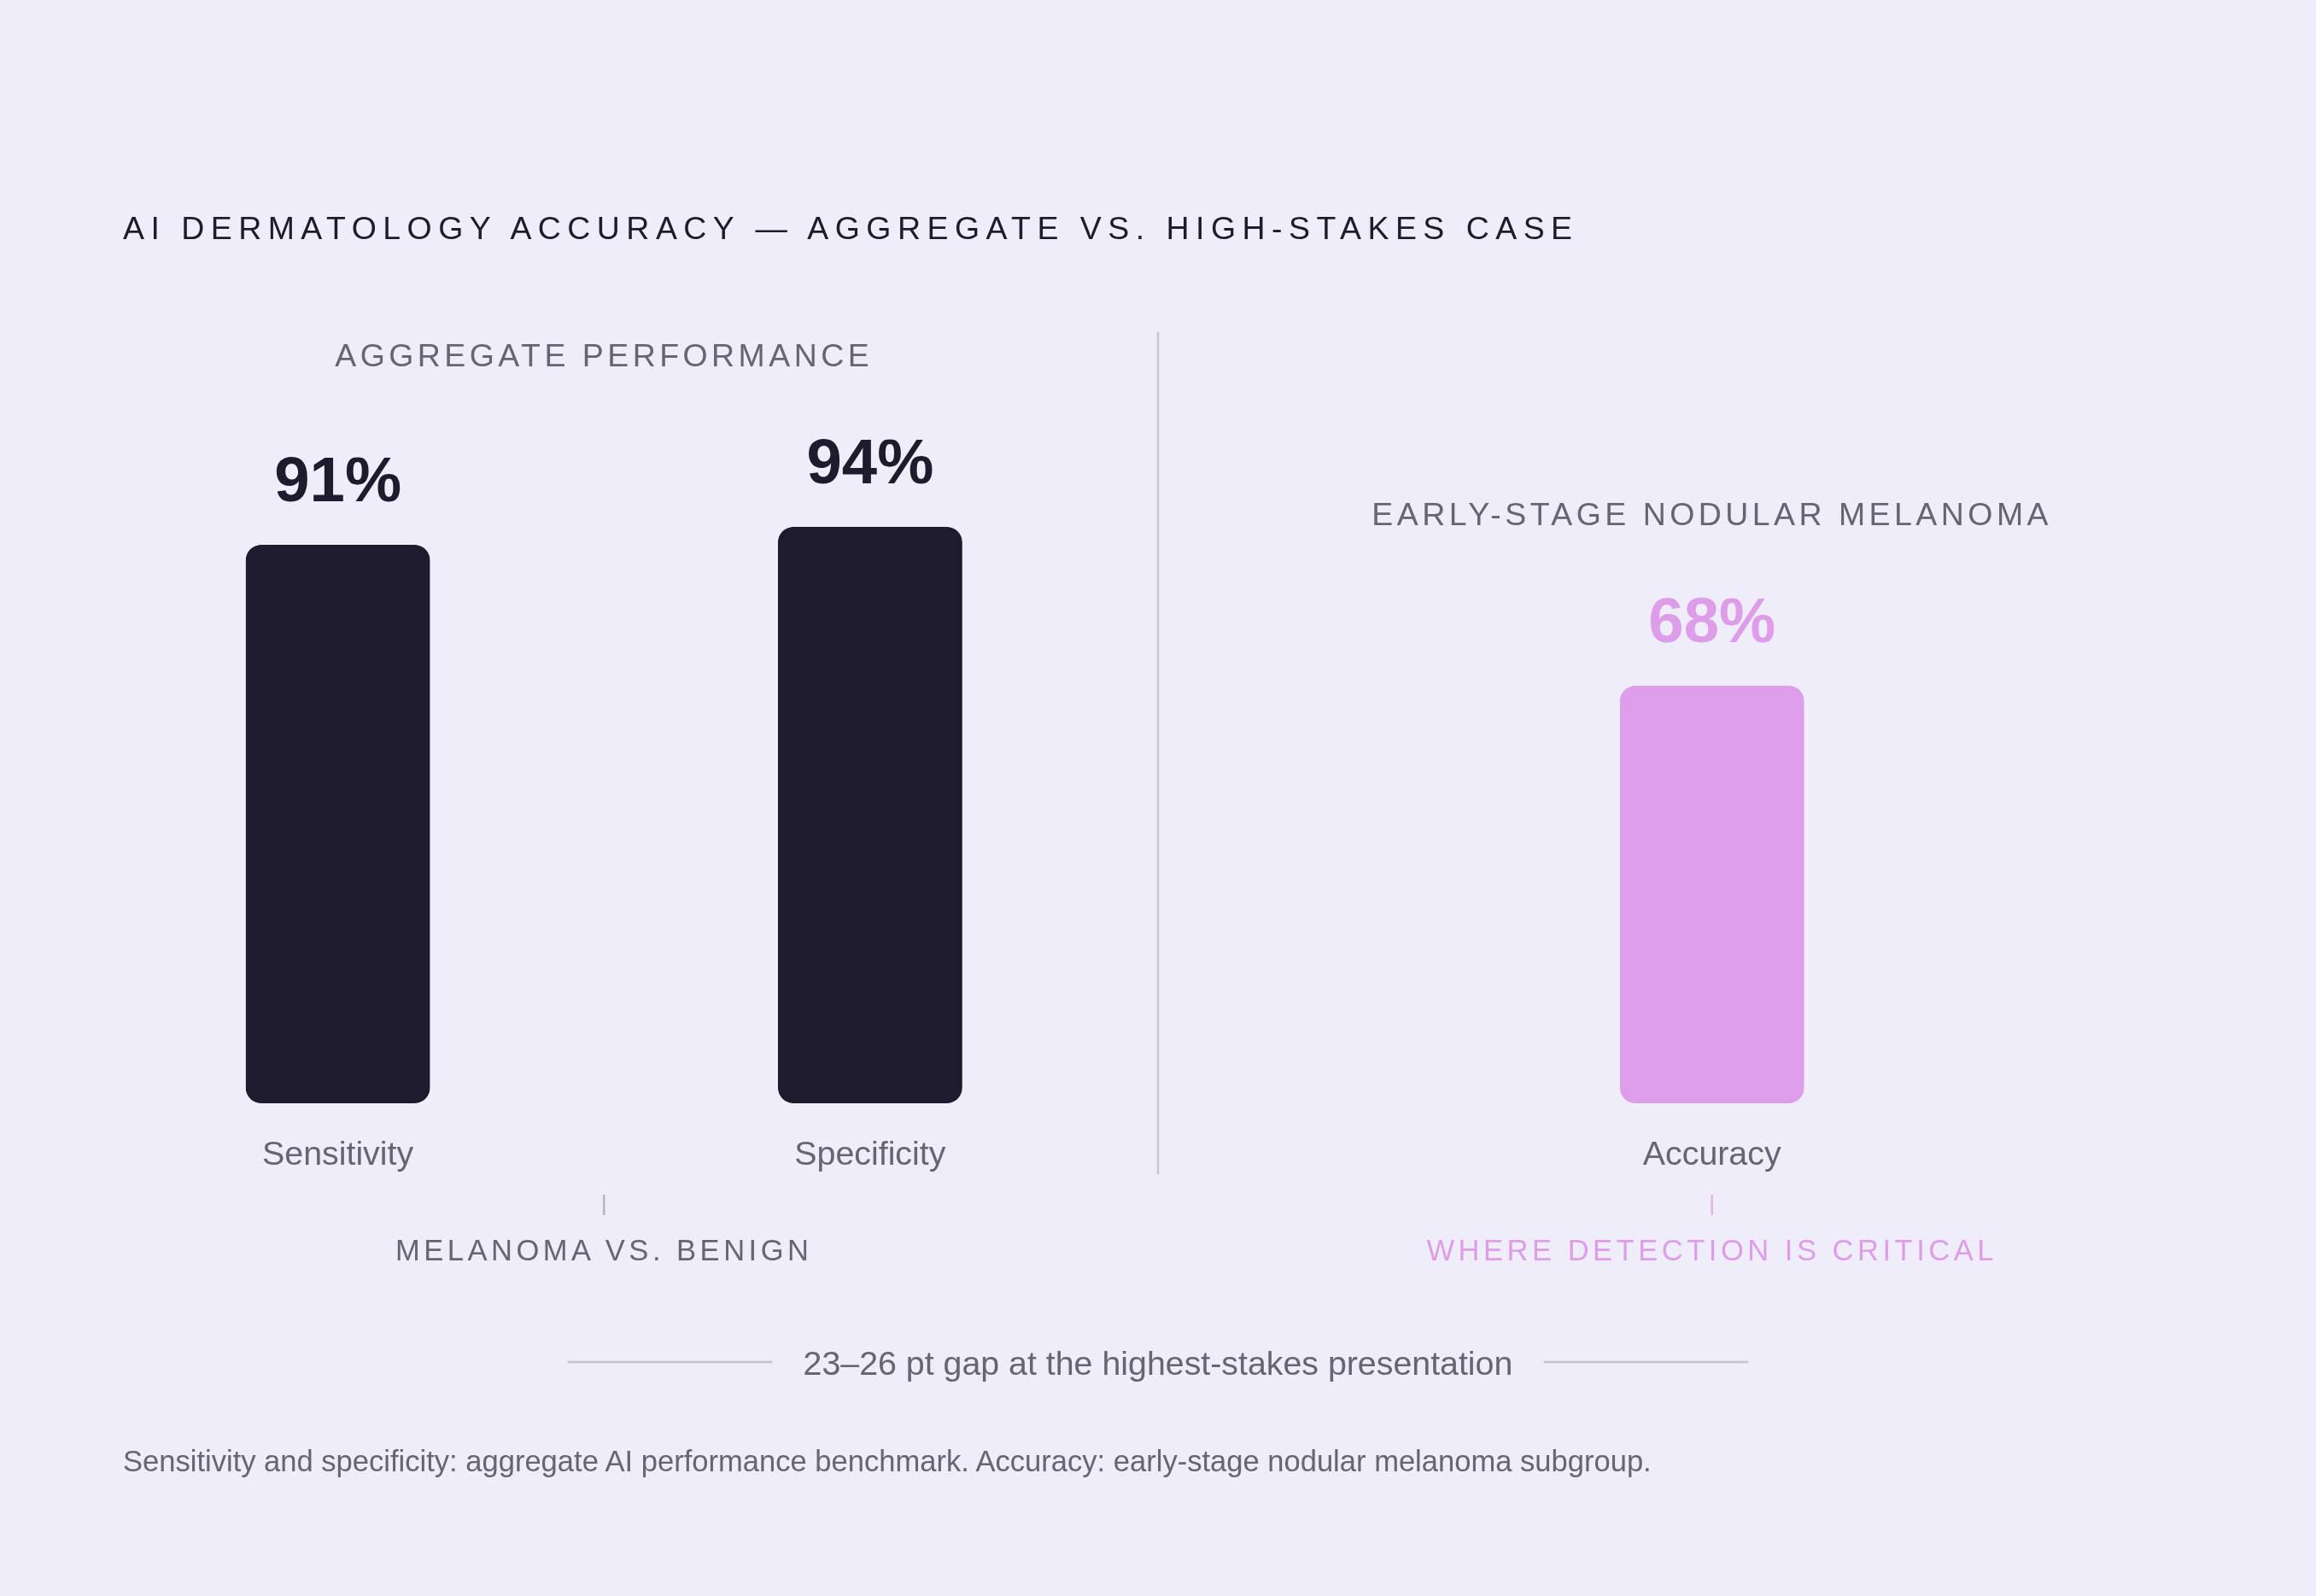
The aggregate numbers on AI performance here are genuinely strong. A 2025 review covering hundreds of studies put sensitivity at 91% and specificity at 94% for distinguishing melanoma from benign lesions, figures that hold up well against experienced clinicians working from images alone.
But that headline number hides where the system actually struggles. On early-stage nodular melanoma, precisely the presentation where catching it early saves the most lives, accuracy in existing systems drops to around 68%. That's not a rounding error, it's the exact case where six months of earlier detection matters most, and the exact case where current AI tools are weakest.
What drives that drop tracks with everything already covered here: lighting that erases color information, motion blur, out-of-focus capture, framing loose enough to block any real comparison across sessions. The photo problems and the AI accuracy problems turn out to be the same problem wearing different labels.
There's a separate issue worth naming on its own. AI training datasets underrepresent darker skin tones, and it isn't a small gap. A 2025 study in the Journal of the European Academy of Dermatology and Venereology looked at roughly 4,000 AI-generated dermatologic images and found only 10.2% reflected dark skin, with just 15% accurately depicting the intended condition at all. That's a training data problem, not a camera problem, and better photography alone won't fix it. What better photography does buy patients with darker skin tones is the best correction currently available: getting lighting, background, and focus right gives these systems the clearest possible shot at working the way they're supposed to, while the datasets themselves slowly catch up.
AI was never built to serve as a standalone diagnostic tool. In a workflow that's put together properly, AI-assisted review supports triage and flags patterns for a licensed clinician who makes the actual call, since the photo feeds a system that a person still reviews.
When to send a photo to a clinician versus when to go in person
Asynchronous photo review fits certain situations well. Monitoring a known chronic condition, acne, eczema, psoriasis, melasma, between in-person visits is one. Getting an initial read on a new but clearly non-urgent change is another. A prescription renewal that just needs visual confirmation of current status counts too, as does a follow-up check after a treatment change, to confirm things are improving or catch an early reaction before it gets worse.
In-person care still matters, and no photo protocol changes that math. A lesion that needs to be felt, not just seen, needs a hands-on exam, since texture, firmness, and depth don't come through a photograph no matter how good the lighting is. Dermoscopy on a suspicious pigmented lesion takes specialized equipment a phone camera can't replicate, and a biopsy needs a biopsy, full stop. Anything changing fast, or showing up alongside fever or fatigue, belongs in front of a clinician in person, and sooner beats later.
A well-executed photo set was never meant to replace in-person care across the board. What it does is route you to the right next step, often within days instead of the weeks a typical dermatology appointment takes to schedule right now. Everything covered here, the lighting, the angle, the distance, the labeling, is what turns a photo from a nice-to-have into something a clinician can genuinely act on. Get those variables right, and a message-based consult, even one that costs a flat and modest fee, closes a real gap for the large share of skin questions that never needed a physical exam in the first place.